
Preparing for commercial print
- The size you choose is the actual size for the finished print.
- Bleed stops white lines being left around your design, allows tolerance when trimming in commercial print, 3mm is a standard bleed size.

- Facing pages depends on whether or not you are doing a DPS/ several pages.
- Actual page size and bleed are two most important things for commercial print.

- Red line is the bleed line
- Black line is the edges of the page
- Purple line is margin edges

- Colour has to be applied to a frame.

- To find swatch palette, go to windows/colour.

- InDesign has less default swatch colours than Illustrator and Photoshop.

- You can use the colour picker to choose a colour.
- X on the keyboard allows you to change the option for stroke or fill (shortcut).


- These allow you to change the colour of the text and the colour of the frame.


- New colour swatch menu.


- The small grey square lets you know if the colour swatch is global.

- New tint swatch.


- The text is a tint swatch of the bottom green.
- Any change you make to the original 100% colour, will change the tints too.

- To use spot colouring open a new swatch and select the Pantone swatch books.

- You will know it is a spot colour because there will be a circle in the square in the swatch palette.
----------------
Prep ready for print:
- Photoshop:
- Colour mode// CMYK/ greyscale/ duotone/ monotone
- Resolution// 300dpi
- Create it at its actual print size
- Format: JPEG, PDF, TIFF, PSD (easier to save as tiff or psd file)
(Use a PSD file for images with transparency as it is maintained)
(JPEG lowers the quality of the image)
- Illustrator:
- Colour mode// CMYK
- Illustrator files are infinitely scaleable
- Format: AI (Illustrator file)

Duotone image/file

- The spot colours from the duotone image are automatically added to your swatch palette.

Illustrator file

- Illustrator files are automatically transparent


This menu allows you to change how the Illustrator is placed into InDesign// transparent or white background.

- Low resolution preview of the Illustrator file. This preview is linked to the original vector image in Illustrator, the preview is only used for you to see where it will be placed on your layout. When it is taken to print the original file is sent through with InDesign. All of the files must be kept together in order for them all to be printed with the correct resolution and quality.
- This means that the InDesign file is smaller and easier to work with, the ink also means that you can edit the file and whatever is on the InDesign file will also edit as it is linked together.

- To edit the original image whilst in InDesign you can either use this menu or press alt and double click and it will open the image in Illustrator.
- When you make a change in Illustrator, if you save and close the image it will then automatically update in InDesign.

- Clicking the two circle allows you to select the image within the frame.


- You can then add a spot colour to the image.
----------------
- Composite print: what you see on screen is what you get when printed.


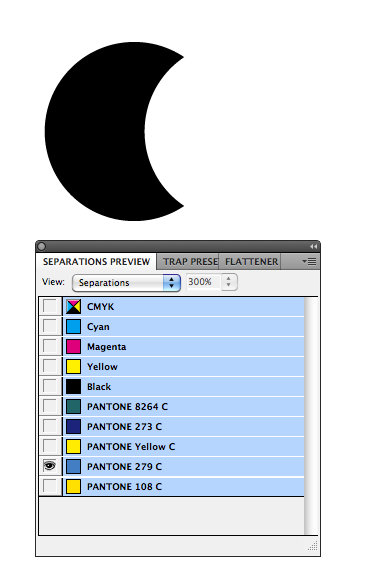
- Separating the colours means that you will get a separate black and white image for each colour. This can be used to make the plate for commercial printing or screen printing.


- Knocked out// prevents other colours being made when printing, (doesnt work with black because it doesnt matter what stock it is printed onto// black ink will overprint)


- This allows you to preview how the overprint of the inks will print.


- Using the ink limit tool shows you whether or not you have exceeded the ink limit for printing, the areas will show up red.
---------------
To prepare an image for print finishing, you must use a spot colour that hasn't been used in the design and let your printer know that the separation is for a print finish i.e. spot varnishing. Select the area and specify that it is going to over print so that the spot varnishing isn't knocking out the other colours.
No comments:
Post a Comment